
Levels Field Test
Looking for a way to determine your training zones? This is a simple field test that can be done classic skiing, skate skiing, or roller skiing to give you a fairly accurate estimation of your training zones.
Equipment needed: Heart Rate monitor, Lactate monitor, 7-9 test strips (usually takes 7-9 finger pricks. Bring some athletic tape to patch up the finger between passes.) Also use alcohol swabs to pre-wipe each finger prick and a tissue to wipe away the first drop of blood. This is standard lactate testing protocol, for more info and to make sure you are getting accurate readings review your lactate monitor manual.
Warm Up:
Do a short warm up: 20 minutes easy skiing
Find the right terrain:
If you are testing in skate technique find a section of trail/road that is flat or a better yet a very gradual uphill .75 - 1k long depending on grade. (We want at least enough trail to eventually ski for 4 minutes at an all-out race pace without hitting a downhill) Try to avoid any steep hills, generally flatter terrain is better.
You might find that the first passes will be a mix of V2 and V1, and the harder passes all V2. This is totally fine since both are all-body modes and will accurately represent your lactate while skating.
If you are testing in classic technique it's best to find a section of trail/road that has more gradual climbing to avoid pure double-pole technique. A mix of double-pole kick and striding is perfect.
Test:
Perform 7-9 passes, each of which will build in intensity.
The time of each pass is not relevant but we want it to be at least 4 minutes in length. At the end of each pass record what your heart rate has been the last 2 minutes and take a lactate reading.
Recover at least 4 between passes
Protocol:
Start at a pace that is below your normal distance pace. For a lot of people this is around 100-120 bpm. This takes a lot of self control, try to keep your heart rate consistent throughout each pass.
Increase your heart rate by 10 bpm each pass UNTIL your lactate reading goes above 3 mmol.
Once your lactate goes above 3 mmol only increase your heart rate by 5 bpm each pass
Keep doing this until your lactate reading starts to jack up above 8-10 mmol and you can be done. No need to max it out unless you want to.
Data:
Just by graphing out your heart rate (X axis) and lactate (Y axis) you can get an accurate estimation of your training zones in this ski technique.
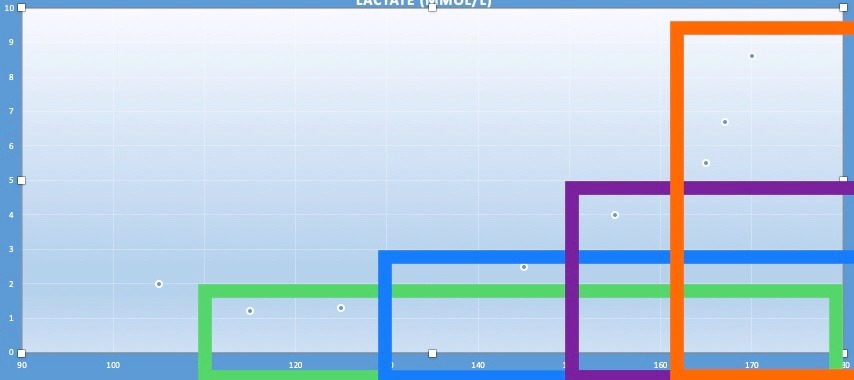
As a reminder we are using the lactate levels below to determine zones: Yes you will see some slight variation among athletes but this is a good place to start when determining training zones.
Zone 1: < 2 mmol
Zone 2: 2 - 3 mmol
Zone 3: 3 - 5 mmol
Zone 4: 5 - 8 mmol
Zone 5: 8+ mmol
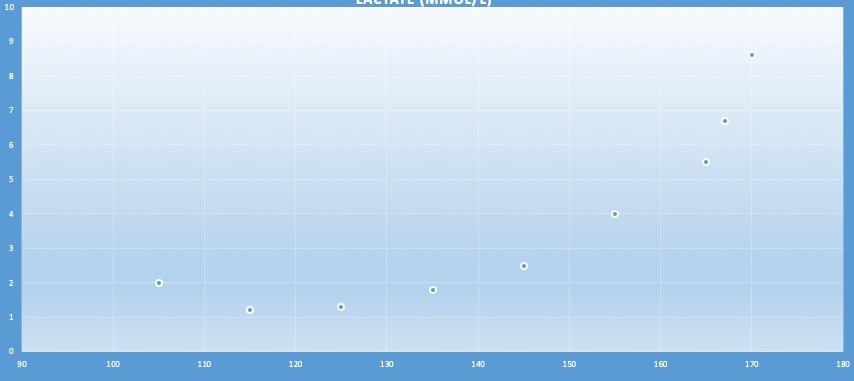
Example: (here is an example of some data typical to a test I might perform on myself.
Pass 1: 105 bpm - 2.0 mmol
Pass 2: 115 bpm - 1.2 mmol
Pass 3: 125 bpm - 1.3 mmol
Pass 4: 135 bpm - 1.8 mmol
Pass 5: 145 bpm- 2.5 mmol
Pass 6: 155 bpm - 4.0 mmol
Pass 7: 165 bpm - 5.5 mmol
Pass 8: 167 bpm - 6.7 mmol
Pass 9: 170 bpm - 8.6 mmol
By graphing this data we can get a good estimation of zones 1 - 4. The most important markers being Zone 1, Zone 3, and Zone 4 since these are the zone most typically prescribed for distance training and intervals.
An important thing to remember is that this is just a training guideline and that in reality our training zones can change day to day depending on the mode ( classic, skate, running etc.) environment (heat, altitude), and physical variables (fatigue, hydration) .
This reinforces the importance of getting lactate spot checks during workouts whenever possible, especially during zone 1 and zone 3 training.
If you have access to a skiing treadmill (or running treadmill) you can perform your test in a lab setting: