
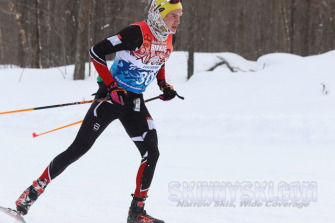
Birkie Course BReakdown
By Luke Brown,
“Birkie Fever / I’m a true believer / just get me to the start line / and I’ll be ready to go.”
Those lines from a popular Birkie song that will be played on the WOJB radio station on race day morning just get me going. But while Birkie Fever is no doubt a real thing and will effectively get you to the start line, a little preparation in knowing the course and preparing for each section, could be what gets you to the finish line.
Here, I’ll lay out a preview of the skate course based on my experience placing 9th in the 2019 Birkie along with wisdom from my dad who is on his 27th. But before I do, I want to encourage you, if you’re racing, to remember that the Birkie requires just what all other races do: setting technique goals, preparing your mind, fueling well before and during your ski, solid ski prep, knowing the course, and executing your race plan to the best of your ability. I’ll help you here on knowing the course, but don’t let the other necessities slip by!
Overview
The 50km Birkie Skate course has a total elevation gain of 1,398 meters (uffdah). The Birkie is just a downright hilly course - even when sections are net elevation losses, there’ll be lots of hills out there. But the first 11k has the highest amount of sustained climbing. After that, it’s a lot of gradual descents and shorter climbs punctuated by five famous (and named) hills. Seven feed stations along the course split up the trail decently well into manageable sections.
- Birkie Trailhead (0k) to Timber Trail (7k)
The start of the Birkie will contain a lot of people and a lot of energy. If you get caught up in the excitement, use it as energy for your body, but keep your head on straight! Ski smoothly out of the start, being aware of yourself, your equipment, and others. The first 1.5k is flat and wide then a gradual turn left will have you skiing along the rolling hills of the powerlines. The powerlines are a time to ski as efficiently as possible while also going fast enough to stay with whatever pack you have your sights set on. If you have some space (depends on what wave you’re in), focus on carrying your momentum up into each rolling hill. You can pick either side of the powerlines to ski along - just look for which side is more open but don’t stress too much - which side you’re on doesn’t really matter. The first sprint premium will be just before you ski off the powerlines. The last point here is to stay positive and stick with a race plan - if your legs feel tired, remember that it’s a long race. If you feel great, stay controlled - your future self going across Hayward Lake will thank you.
- Timber Trail (7k) to Fire Tower (11.5k)
After the powerlines, the trail narrows (so make any moves around slower skiers before this) and you’ll ski into the woods and continue the upward trend of the powerlines along serpentine uphills all the way to the High Point at 11k. Once again, focus on carrying momentum into each climb. On the climbs themselves, focus on gliding well on each ski - this will conserve energy for the long haul ahead. If and when you find yourself surrounded by a lot of people, stay relaxed and do your best to avoid stepping on poles, getting your ski caught in the snow bank as you try to pass, or skiing up the middle. It’s easy to get bogged down if your skiing starts getting sloppy! Also, a downhill sharp left turn around 8k will have snowmobilers lined up waiting for you to wipe out - beware! From the High Point you’ll descend a bit until the Fire Tower feed station.
- Fire Tower (11.5) to Boedecker (16.1k)
Continue to descend! And this time you’ll get some fast and fun downhills as well as some more extended recovery time. As always, ride a flat ski on the downhills, tuck as efficiently as you can, and let yourself take in some good oxygen. This is also a good section to take in some food and liquid if you are self-feeding. Remember: feed early, feed often! Just before you get to the feed station at Boedecker, you’ll go up the first named hill - Boedecker Hill (imagine that).
- Boedecker (16.1k) to Highway OO (20.6k)
Once again, from Boedecker feed station you’ll continue the overall descent (with more up and downs as you get closer to OO) until just before the fourth feed station. Double O Hill will greet you with an enthusiastic upward trend - just say hello back with a nice smile while working on your technique goals. On an uphill just before you get to the OO Bridge (generally a one-skier wide bridge) be aware of the sprint premium. For those close to the lead, this could cause a bit of separation in the pack as some top skiers look to get extra cash and others just hanging onto the pack feel the heat.
- Highway OO (20.6k) to Gravel Pit (29.5k)
The next two sections are the easiest in terms of elevation gain and don’t include any major climbs. However, you’re also in the heart of the race so fatigue begins to set in. Here, I would focus on skiing big and long. If the snow is fast, slow down the tempo and let your ski glide. Additionally, the gliding properties of the snow may be different after OO because of all the skiers from the Kortelopet the day before (which starts at OO and finishes on Main Street).
- Gravel Pit (29.5k) to Mosquito Brook (35.4k)
As mentioned, this section continues the net downhill trend and includes a couple snow covered road crossings. But remember, a net downhill trend in the Birkie doesn’t mean it’s all downhill. There are always hills. Enjoy! And a reminder here to continue to take in feeds.
- Mosquito Brook (35.4k) to Hatchery Creek (41.1k)
Perhaps the most difficult section of the course - two named climbs and, well, you’re not really close to the finish and you’re deep into the race. Soon after Mosquito Brook feed station, you’ll start skiing up 39k Hill - a fairly long, decently steep climb. Bitch Hill will be up next - it’s a bit shorter than 39k Hill but even steeper. You may be offered a shot-ski here - your choice on whether or not the alcohol will help you but you could ask Andy for his official advice. The good thing about getting to the top of Bitch Hill is that you get some recovery afterward - and each major climb from here on out is followed by a longer recovery descent.
- Hatchery Creek (41.1k) to Main Street Finish (50k)
Focus in and finish hard! Here’s what you have left after the last feed station at Hatchery Creek: 1) Sunset Hill, 2) an unnamed sizable climb, 3) Lake Hayward, and 4) the Main Street finish. Hopefully your feeds from earlier in the race will be kicking in to avoid cramps. As you head onto the lake, it’s wise to tuck in behind another skier as it’s often very windy. Coming off the lake, over the Birkie Bridge, and along Main Street, the snow might be choppy and sugary as it will have been trucked in only a few days before. But you’re there, you’ve done it!
Take in all the cheers. Savor your accomplishment. Let the love of skiing and Birkie Fever fill your heart. Then go get a beer and bratwurst to fill your belly. You’ve done it!