
INJURY MANAGEMENT HOME “HACKS”
By Kurt Jepson,
Take an old traditional length sock with some elasticity remaining and cut/remove the “tube” section approximately 4-6 inches from the top. Roll an edge onto itself and then place a 2-3 inch section of tubing, rectangular ½ inch foam, or felt, etc. into the shelf and continue to roll the sock edge onto itself encasing the “compression pad”. Slide on the rolled-up sock approximately 1 inch distal to the tendon- bone junction of the structure to be addressed with the internal pad compressing the tissue approximately 1 inch from the insertion point. Next, engage in the provocative activity (i.e. hill running, stairs, vigorous grasping, pole use, etc.). The sock device should be quite snug but not cause sensory or circulatory issues distally. Non-elastic tape may be placed on top of the “band” to enhance tissue compression. It should be utilized only long enough to “test” it`s efficiency, then removed.


As intensity continues to build this summer and fall, athletes are bound to have some “aches and pains” worthy of addressing. Let`s look at a few home injury management “hacks”. Some make us chuckle, some make us say, “why didn`t I think of that?”
Everyone has their “go to” for management of a sprain or strain utilizing home modality or orthotic “inventions”. The principal motivations for their use include; ease of application, economy, convenience and hopefully a grain of efficacy. In actuality, most “easy fixes” carry little weight when it comes to scientific scrutiny. Given this, there will be reference in this post to sources which examine the efficacy of these home remedies. There is a basic premise to delivery of medicine, that being “do no harm”. The interventions mentioned here meet that criterion provided they are utilized with logic.
Athletes should be engaged in their injury management, just as their training. Remember, home remedies should never replace proper evaluation by a medical professional, particularly if the injury is the result of traumatic input, fails to improve within 2-3 days or causes adjacent symptoms such as pain radiation and neighboring joint dysfunction, or of course, exhibits signs of infection if a wound is involved.
Let`s start with the most obvious one, ice.
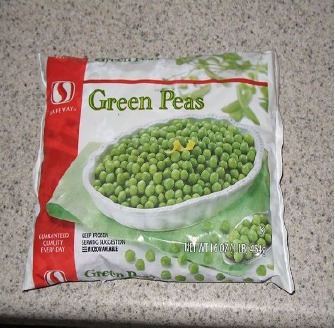
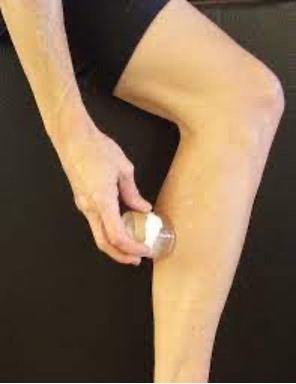
There are many ways to apply this modality at home in the absence of commercially available re-useable ice packs. A classic item is a bag of frozen corn or peas. They easily mold to the body contour, can be re-used multiple times, are cheap, accessible and simply require a thin insulating layer such as a T-shirt, sock or paper towel between the bag and one’s skin to avoid “frost nip”. A homemade icing “slushy” bag comprised of 50% crushed ice and 50% isopropyl alcohol placed in a durable zip lock provides a similar option. Lastly, an ice cup for massaging of superficial tissues can be very soothing and requires no skin/ice interface as the melting water will serve this role. Take a small (~4 oz) paper cup, fill ¾ with water and perhaps a dub of your favorite topical pain reliever, and stick in the freezer. Peal back the paper when ready to use and set the timer for 8-10 minutes. They usually last 2-3 sessions.
Here`s the rub, does cryotherapy actually have value? We discussed the relative benefit of cryotherapy previously on this site via, “Icing after Injury, Evidence Based or Folklore?”, check it out (Aug 2019).
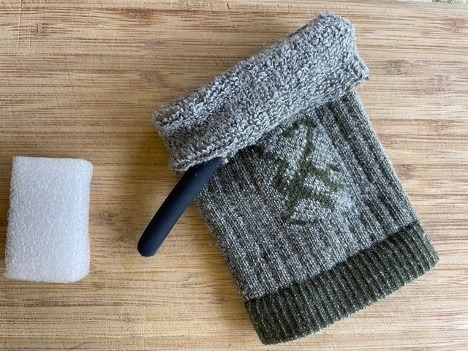
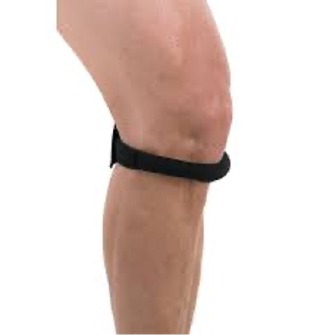
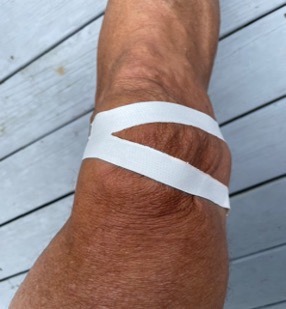
Next “hack”, a homemade Counterforce Band used to off load tendinous structures when irritated. The most common applications involve “Tennis Elbow” (lateral epicondylitis) or “Jumper`s Knee” (infrapatellar tendonitis). Both of these issues can arise from aggressive roller skiing or bounding early in the intensity period. Counterforce Bands are widely available commercially but can run $25 or more. If you`d like to test the concept of bone-tendon junction unloading prior to buying one, try the following.
Take an old traditional length sock with some elasticity remaining and cut/remove the “tube” section approximately 4-6 inches from the top. Roll an edge onto itself and then place a 2-3 inch section of tubing, rectangular ½ inch foam, or felt, etc. into the shelf and continue to roll the sock edge onto itself encasing the “compression pad”. Slide on the rolled-up sock approximately 1 inch distal to the tendon- bone junction of the structure to be addressed with the internal pad compressing the tissue approximately 1 inch from the insertion point. Next, engage in the provocative activity (i.e. hill running, stairs, vigorous grasping, pole use, etc.). The sock device should be quite snug but not cause sensory or circulatory issues distally. Non-elastic tape may be placed on top of the “band” to enhance tissue compression. It should be utilized only long enough to “test” it`s efficiency, then removed.
If the symptoms are reduced, it may be worth purchasing the appropriate counterforce strap from a vendor. Commercial Counterforce Bands may be used for extended periods of time as they are non-elastic and specifically designed for the task of dissipating/circumventing contractile force prior to its cumulation at the tendon`s insertion point (Nirschl et al 1981, Priest 1976).
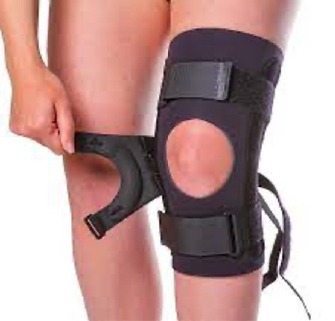
Below: example, commercially available Infrapatellar Counterforce Band/Orthosis.
The literature (although some dated) is supportive of the use of counterforce bands in the management of elbow lateral epicondylitis in terms of symptom reduction and wrist extensor force production during activity (Burton et al 1985, Groppel et al 1986, Nirshl et al 1977, Vicenzino et al 2003, Jafarian et al 2009). Infrapatellar use follows a similar scenario.
Achilles Tendon issues plague many endurance athletes. It can significantly impede one`s ability to participate in vigorous activities. Early recognition and management via cross training, shoe and terrain changes, physical therapy, physician modalities, and postural balancing are all important interventions. The simple addition of a 1 cm heel lift with or without “varus” inclination can be an extremely effective means of lessening the stress across the distal 1/3 of the Achilles complex during training and ADL (Activities of Daily Living).
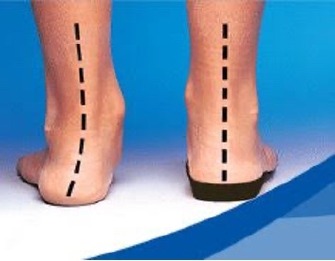
Heel lifts work in two ways. First, they elevate the calcaneus placing the Achilles tendon complex “on slack” reducing tensile pre-load during the stance and propulsion phase of gait/running. Second, a heel lift places the foot in a relative plantar flexed position which kinematically reduces its ability to pronate resulting in less calcaneal inclination during mid-stance. Pronation as depicted above on the left side, results in calcaneal valgus (collapse inward), and due to the Achilles` relative medial (inside portion) attachment to the calcaneus, stresses those fibers dramatically (left dotted line). Heel lifts with 3-5 degrees of varus (outward) inducing “cant” perform even better.
Lifts are commonly found for a few dollars at pharmacies and department stores. Some allow layering to adjust the height. Most are “feathered” toward the front for comfort. “Retired” shoe insoles can be trimmed and layered to fashion a lift as needed until a proper lift can be obtained. Always clean and save your old insoles for “recycling” purposes.
Any high-density household foam can be fashioned into a lift. A Dremel or shop grinder can be used to “feather” the leading edge for comfort. I typically recommend lift use bilaterally for obvious reasons. I also inform patients that resolution of their issue long term, will occur via therapeutic exercise, not appliance use. The use of a lift is best viewed as a temporary management adjunct unless one has a true anatomic limb length asymmetry.
Next “hack”, taping the patella-femoral joint for alleviation of anterior knee pain. I recommend a review of the Nordic Solutions article on PFD (Patella Femoral Dysfunction) from March of this year, for a refresher on PF kinematics and the “anecdotal” concepts involved with taping. As Callaghan et al suggest (JOSPT 2016), there is likely no downside to taping the PF joint in conjunction with appropriate rehab strategies. I often use taping to help diagnose the origin of non-obvious knee pain, or as a precursor to patella-femoral bracing to test efficacy and justify expense.
Patella Femoral tape has blossomed into an industry full of choices and accolades. Many are expensive and hard to obtain. Any fiber-based tape will induce soft tissue change sufficient to “test” the benefits of external “control” of a mal-tracking patella. White athletic tape, duct tape, K-tape, etc. will all work in the short term. It is important to mention here that some individuals are sensitive to adhesives and if you have a history of adverse dermal response to “glue” then this “hack” is NOT for you. Short term use is key. The goal is simply to assess whether your knee pain is patellar based or related to other structures.
There is a specific technique involved with PF taping addressing multiple planes of motion, but often the “medial glide inducing” strip of tape is most beneficial. This concept was introduced by PM Palumbo, MD over 30 years ago, so the “split” tape medializing technique often bears his name.
Simply cut a 6-inch measure of fibrous 1 ¾+ inch tape and longitudinally split it 5 inches leaving 1 inch intact. Place the split/unsplit junction at the lateral (outside) border of your patella (kneecap) and with the knee relaxed and fully extended, direct the patella medially with your free hand and hold it there as you lay the “tails” of the tape flat to the inside of the knee forming a “Y”. A dry and freshly shaven knee will improve adherence. Skin “wrinkles” medial to the patella indicate appropriate tension. A couple of layers can be overlapped if desired.
Test the result by participating in a previously provocative activity (ie stairs, jogging) and note any symptom relief. If some improvement is noted, a trip to your clinician for specific assessment and “real” taping instruction may be worth your time. Lateral “J” pad buttress bracing may also be a viable option for you in conjunction with specific exercises. If you get no relief, your PF problem may be more complex (involving numerous planes of motion, bony changes, ligament tightness) or symptoms may have an intra-articular origin.
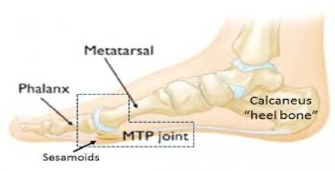
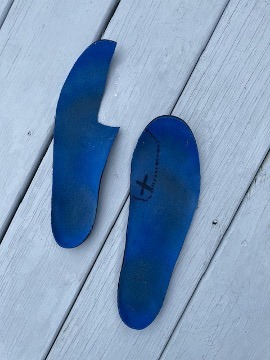
The last “hack” is for those experiencing pain under the great toe. Plantar (sole) first ray pain is typically present when ground reaction forces during propulsion (running or skiing) accumulate excessively at the metatarsophalangeal (MTP) joint of the “big” toe. Biomechanical causes are numerous. Examples include; stress injury to the sesamoid bones (2 small patellar like bones encased within the flexor tendon), a tight medial plantar fascia band exaggerating the “windlass” affect during toe off, excessive pronation leading to 1st MTP compression and perhaps early bunion formation. The list goes on and many of these maladies have been discussed in more depth on this site in previous postings (Jan, Feb 2020).
This home “hack” involves unloading the great toe as it moves into a dorsiflexed and tensioned state during the propulsion phase of gait (ie CL skiing).
Simply cut a “window” release, known as a first ray drop out in the orthotics world (Langer Biomechanics Mesa AZ), in a “retired” shoe insole. Mark the imprinted MTP pressure point on worn insoles and cut distally to the end.
This allows the MTP to settle into a void and places more propulsion requirements on the other 4 toes. It lessens ground reaction load and decreases the amount of forced extension the MTP undergoes late in the gait cycle. You made need to layer 2 insoles with cut outs to affect your symptoms. Do both sides. This is a simple “test” to see if a more formal orthotic device, complete with corrective posting (see related Nordic Solutions articles) is worth a try.
So, there you have it, fast, simple, cheap “hacks” to try at home prior to advancing to more formal injury management options.
Good training!