Flex testing and wax pockets
By Andy Newell
Having the correct grip wax on the bottom of your ski on race day is important, no doubt about it. Making sure your skis are both easy to kick and fast however is equally important to performance, particularly how the wax is applied in relation to the flex of the ski. These are two complicated subjects but what skiers at any level should learn is how to test classic skis the right way in order to identify how to make waxing adjustments before the race. This involves understanding how classic skis kick and how adding or subtracting grip wax in specific areas can increase performance.
We could write an entire book on ski camber and classic waxing. In the future I will post more in-depth articles about ski selection, especially in the Fall when skiers will be choosing race skis for the season. Like I’ve mentioned before both Caldwell Sport and Boulder Nordic are two great recourses when it comes to selecting race skis.
There are however a few important ski characteristics that will help us better understand classic ski testing.
How stiff is the wax pocket?
You’ve probably seen pictures of people squeezing together a pair of skis to look at the pocket. We do this by holding the skis at the bindings and pressing together to see how the wax pocket closes. Why do we do this? It’s a way of seeing how stiff the wax pocket is but more importantly how much residual camber is under the foot. Residual camber = the final compression of the wax pocket when under full body weight i.e. when you are kicking the ski. The amount of force it takes to completely close the last bit of a wax pocket will determine whether a ski is suitable for klister or dry-wax.
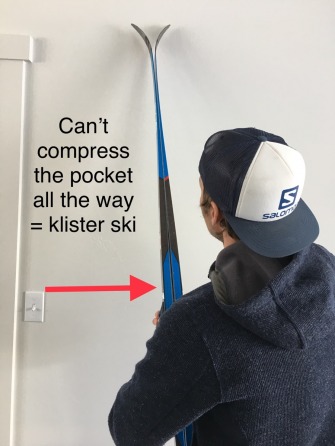
Skis that have a lot of residual camber cannot be closed completely under the foot which means they can carry a higher volume of wax under the foot without dragging it on the snow. Skis that can’t be closed all the way will be good for larger amounts of sticky wax like klister.
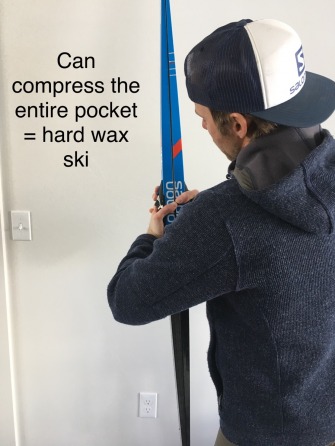
Skis that compress all the way when pushed together will take less force to kick on snow but will be fastest with a lower volume wax prefect for dryer hard-wax conditions.
Firm conditions or soft conditions?
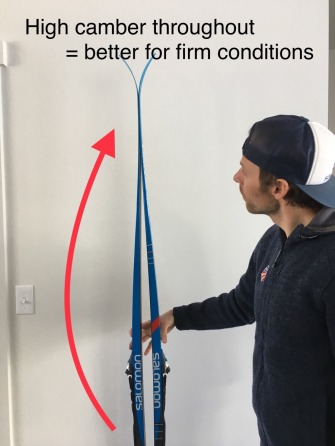
The type of camber in a ski can also affect how well the ski will glide in certain conditions. Take a pair of skis and ever so slightly press them together. Skis that bow out a lot (have a high camber throughout the entire ski) will be better suited for firm tracks.

Skis that have more base contact while under a slight squeeze will be better in soft conditions. Furthermore, if the ski tips slay apart while the pocket is being compressed it’s another indication that the ski will be faster and ‘float’ better in soft conditions.
Being aware of just these simple differences we can be more productive with wax application and testing.
Application
You can see from the photos above that good dry-wax skis often look like they have high camber throughout the entire ski, but the pocket will close smoothly and completely. This is why applying several thin layers of wax to a dry-wax ski is important and doing so in a ‘pyramid style’ to match the pocket.
Pyramid style waxing means applying the first two layers of wax over the entire pocket then adding shorter layers to the area underneath the ball of the foot to mimic how the pocket closes. Dry-wax skis can handle as little as 3 layers of wax or as much as 5-7 layers depending on how the pocket closes.
When it comes to Klister skis (or skis with residual camber) pyramid waxing becomes less important, but we will often add different varieties of wax to ensure grip. An example of this is applying a layer of colder klister as a base but adding a few dabs of a warmer stickier wax under the foot before smoothing it out. This strategy should ensure solid kick, and due to the characteristics of the residual camber in the pocket the stickier wax shouldn't drag on the snow.
With both dry-wax and klister it’s helpful to start thin with your wax application so you can continue to add layers throughout the ski testing process.
Testing Kick
Once you have the skis out on snow the first thing to test is how easily you can kick the ski. One of the ways you can do this is by skiing up challenging hills or what I like to do is ski sections of the course without poles. If you can kick a ski without poles, you should be able to kick it when you are absolutely exhausted at the end of a race.
If you are slipping during your ski test (which is not uncommon) before making any adjustments, take a moment to pinpoint HOW you are slipping.
If the wax is gripping the snow but you are slipping at the finish or end of your kicking motion it’s most likely a thickness issue and you need to add more of the same wax under the toe. If you are skiing up a hill and you begin to slip as the hill gets steeper it can also be an indication to add thickness.
With dry-wax skis if you add 1-2 short layers and the slipping continues its time to try a ‘cushion’. A cushion layer means adding a short pyramid layer of warmer kick wax under the foot then covering with your initial wax. This should give you increased kick without slowing down the ski too much.
On the other hand, if you feel you are slipping because the wax is not getting enough purchase on the snow during the INITIATION of the kick it probably makes sense to add a ‘bump’. With both dry-wax and klister a bump means adding a warmer, stickier wax through the majority of the pocket and under the foot.
Understanding the subtle differences in how you skis are slipping will greatly increase your chances of making the right waxing adjustments.
Testing Speed:
If your skis are kicking well the second part of classic ski testing is to feel the speed of your wax pocket. The camber of the classic ski should prevent any extreme dragging while the skier is standing with equal weight distribution on the skis, but what takes more fine-tune testing is determining speed while gliding on a single ski (while the ski has more than 50% body weight on it)
I recommend feeling classic skis at speed by using these two methods.
First, is a downhill striding test. Find a section of trail with a gradual downhill and instead of tucking with equal body weight on each ski stand up and do a light stride down the hill without poles. If you feel the snow catching underneath your foot during this weight transfer it’s a good indication that the overall thickness of the wax job is too much.
Second, pay attention to how your wax pocket feels while double poling. This is something that a lot of people forget to do and I think it’s incredibly important. Not just feeling them while double poling, but doing an aggressive racing style double pole. If the skis are waxed correctly for the wax pocket they should feel free under the foot while double poling. If you feel your skis dragging while coming up onto your toes while double poling it means you need to remove a small amount of wax from the front of the wax pocket. In this instance I recommend removing a centimeter or so of wax from the front of the pocket using a putty knife and smoothing it out with a cork.
All these methods can be improved and developed as athletes get more comfortable feeling subtle differences in how skis kick and how each ski glides under their foot. As with all ski testing, practice makes perfect so don’t just leave it for race day. Embrace the challenge of feeling perfect classic skis and learn from each classic training day.